This week at ReadyForMasterclass we are announcing a new Sylenth1 bank by ReOrder and MYR. ReOrder and MYR went through their tracks over the past decade and picked out their favorite presets – ones they used again and again because of how useful they were, and created many new presets to complement them. As a result, you’ll find sounds like the famous Skypatrol pluck, MYR’s favorite acid sequences, and ReOrder’s awesome psytrance basslines in addition to brand new sounds perfect for techno and uplifting trance. In this article, we are going to show some of the unique features of Sylenth1 that make it still relevant for dance music producers. For this example, we will be creating a gritty acid sound perfect for uplifting trance and techno.
First, let’s start by initializing the preset. Go to the middle section and select Menu -> Preset -> Clear | Init.
Setting up the Oscillators
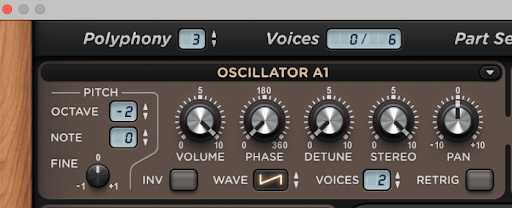
We are only going to use one oscillator for this sound, and I am setting the octave of this oscillator to -2 to get the sound in the lower range. I’ve added two voices to give the sound some stereo width, but I have the detune turned all the way down. By turning the “stereo” knob all the way up, the two voices will be panned left and right. Be sure to uncheck the “retrigger” button in the bottom right of the oscillator section to ensure the left and right voices start at different phases when the note is pressed. This gives the sound some stereo width and helps it feel more dynamic.
Setting Up Filter 1
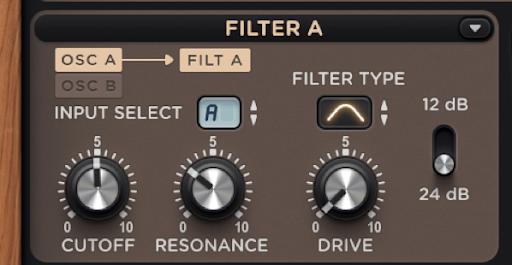
Moving to the filter section, we are going to select a 24dB/Octave Bandpass filter. This can be changed by using the “filter type” selection, and making sure 24dB is selected for the slope. I’ve added quite a bit of resonance to make the sound “squelchy.” While the overall may be thin now, this resonance helps the sound come to life when we add distortion.
Adding FX
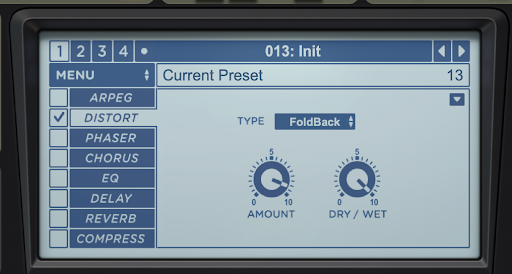
Moving on to the section in the middle of the screen, toggle the distortion on by clicking the little checkbox. I’ve chosen to go with the foldback distortion type. Since I want this to be a very gritty sound, I’ve added quite a bit of distortion: the dry/wet knob is set at maximum and the amount is 9.1.
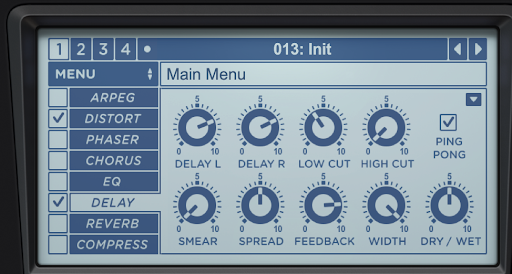
Now turn on the delay and set both the left and right delay times to 1/8D (A dotted eighth note). I turned up the low cut filter to 100Hz so it does not muddy up the mix, and set the feedback to 80% because the delay tail is very important to keep this sound from sounding too dry.
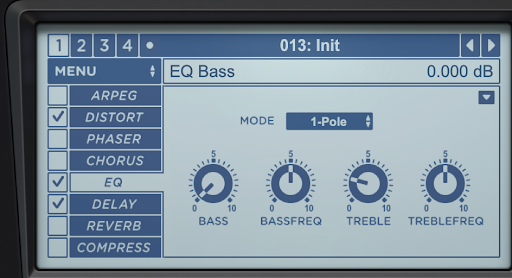
Lastly, move to the EQ section, and enable it by clicking on the box next to “EQ.” There are four knobs here corresponding to two bands – a low and high shelf filter. I turned the gain on the low shelf (the “Bass” knob) all the way down, and added about 3dB of gain to the treble (it defaults to 6dB of gain, so you’ll likely need to turn it down). I find this EQ, which is very similar to that on the Roland JP8000, is good for brightening the sound and bringing out the edginess we want so this acid cuts through the mix.
Modulation
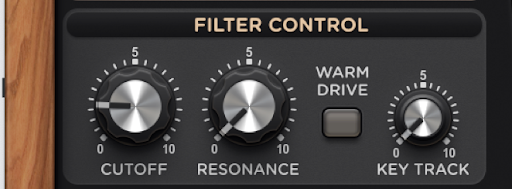
We want to be able to sweep this sound across the track, so let’s set up the modulation wheel to control the filter cutoff. First, turn the filter cutoff knob in the filter control section to about 2.4. This will be our “lowest” point (I’m using the big filter control knob because this controls the cutoff of filters 1 + 2 together. We aren’t using Filter 2 at the moment but if we did we would want the cutoff of that filter to move with the modulation wheel as well.
To set the maximum point, first turn the modulation wheel in the bottom-left (or on your MIDI controller) to maximum.
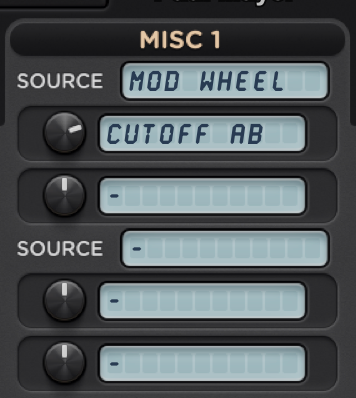
Now, take an empty slot in the modulation matrix and for the source, select Mod Wheel. For the destination, select “Cutoff A and B” (it will display as Cutoff AB in the window). Turn the“Amount” knob up to the maximum you want it to go. I found that 5.2 sounded good. For finer control, you can hold down shift while you click and drag the knob for more precision when adjusting.
Adding Filter B
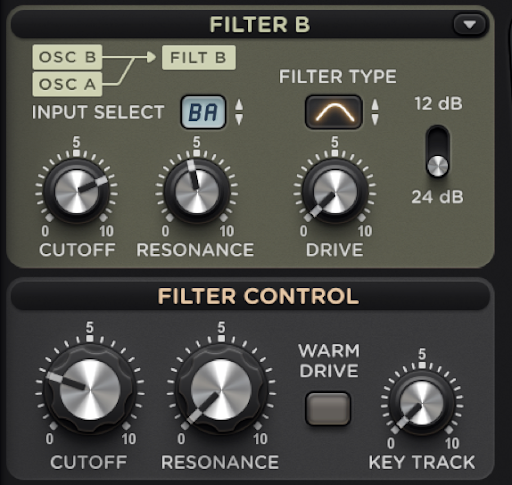
Most synthesizers do not have parallel oscillators like Sylenth1, so we can use a special feature here to make the sound even more interesting. Select “Part B” on the part select window to change to the second page. We won’t use any oscillators here, but we will use the second filter.
Move down to the filter section on Part B, and for the Input Select, select “Oscillators Part B and A.” This will route the oscillators from part A to this filter as well. Now, we are going to use similar settings with this filter, however we are going to offset the cutoff to create two peaks in the sound. Select a 24dB/Octave Bandpass filter as before, and turn up the resonance to about 4.5. Now, change the cutoff knob under Filter B. A value of 7.4 sounded good to me, however experiment with different values and choose the one you like the best. Note the difference between the two cutoff knobs: the cutoff knob under “Filter B” only controls filter B’s cutoff, whereas the large cutoff knob under the “filter control” controls the cutoff of A and B together. This is why we mapped the modulation wheel to Filter A and B, so as we move the mod wheel, both filters open and close.
Using this Sound
From here, you are done with the sound design! To use this sound, I like playing short notes while moving the modulation wheel. As the delay tail washes over the sound, it fills in the gaps between the notes. Moving the modulation wheel adds movement over time, which the delay captures, so experiment with different patterns and movements of the modulation wheel. I often try to play these sounds with a MIDI keyboard and record my playing and modwheel movement at the same time. Then I’ll go back later and quantize the notes and smooth out the mod wheel to cause it to open and close at different places in the track. This sound works wonders for intros and outros, because it cuts right through the mix and can have a lot of movement.
Conclusion
Hopefully, this walkthrough has given you some tips for creating those nasty acid sounds throughout your track. Check out the Sylenth1 bank ReOrder and MYR did, where we have dozens of these kinds of acids, including sequences that use the built-in arpeggiator. Sylenth has a great distortion engine which makes it easy to make these kinds of sounds, but it also works great for midbasses and plucks.